How to verify site ownership on Google Search Console
Let’s get back to Google Search Console and focus on a crucial aspect of getting started with the platform of free tools provided by the California-based company, namely the process of site ownership verification, which basically allows us to prove to Search Console that we are indeed the owner of a specific website. Site ownership verification is therefore a priority and crucial step to enable access to the data.There are as many as 7 different methods to proceed, but also a variety of errors we can run into that result in the failure of the operation.
Google Search Console site verification: what it is and what it is for
Verification is the procedure that “allows you to prove that you own property,” which is necessary for Google to be certain that “you are the owner of the site and prevent others from having access to your private search data,” explains Daniel Waisberg, Google’s Search Advocate, in an episode of the Google Search Console Training series on YouTube.
Through this process, actual site owners in Search Console can gain access to sensitive Google Search data about the domain entered, which can affect its presence and behavior in Search and other Google services. In addition, a verified owner may grant access to others, who may view or manage the data of such sites in Search Console.
Beyond its value, however, at the end of the day verifying your site is still “a simple step that tests your ability to update and make small, unseen changes to your site,” Waisberg says, and takes “only a few minutes.”
Regardless of which method you choose to use, the procedure for property verification in Google Search Console always begins identically: after saying goodbye to the preferred domain setting, you now have to log into Google Search Console and click on “add property” or choose an unverified property from the selection bar; or, if this is the first time ever logging in with a property that has never been verified, the GSC wizard guides you through the process.
The second step is to indicate the type of property to be verified from the two options available – Domain and URL prefix – which allow all URLs on the site and subdomains to be verified or only addresses corresponding to those added, respectively. Waisberg recommends creating at least one domain property to represent the site because it provides the most overall information for project management, while URL prefix would be used only to monitor individual sections of the site or to restrict access to all information to any external contributors.
After verifying a property, all secondary properties added will be automatically verified using the same method as previously used: thus, if we chose the system with HTML file loading, all secondary properties created will be automatically verified using the same HTML file loading.
Google Search Console, how to verify site ownership
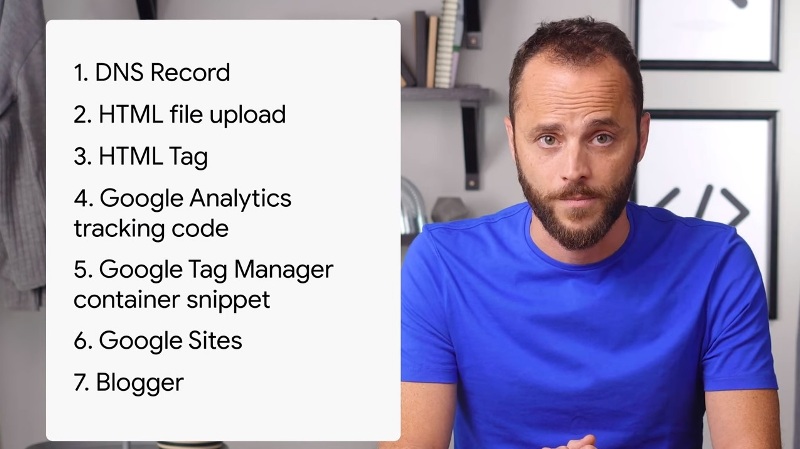
There are 7 methods to correctly complete this procedure, according Mountain View’s Search Advocate, and for the record they are DNS record, HTML file upload, HTML tag, Google Analytics, Google Tag Manager, Google Sites and Blogger, each with its specific characteristics, among which everyone can find “the system that suits his needs the best”.
Other useful information to keep in mind is that the verification remains valid as long as Search Console is able to confirm the presence and validity of the verification token.
Google uses the Google Site Verifier user agent to periodically perform site verification and check if the verification token is still present and valid, and we will receive a notification if the verification can no longer be confirmed. If the problem is not resolved, Google will cause our property-related permissions to expire after a specified grace period; if all verified owners lose access to a property, all users will consequently lose access to the Search Console property.
But let’s see how each verification method works in more detail.
Verification with DNS record and domain name provider
This system works with the adding of a record DNS in the domain name provider. It was implemented back in 2019 and, as Waisberg highlights, even if it is the most complex and the only supported method for domain verification (but it can also be used to verify the properties of an URL). This is useful because Domain properties include data for all protocol variants (http/https) and subdomains of the property.
Right after entering the domain name on the form, we need to choose one of two options listed in the following box: select the provider of our domain name, if present on the list, or add a new record TXT.
First case is both quicker and easier: we land on the provider’s login page, where we can access and then grant the communication with Google Search Console, to which we will be later redirected. The verification generally happens in a matter of few hours, or some days tops, and if necessary we can always repeat the entire process if we fear it did not go through, by always keeping in mind that sometimes DNS record modifications can be really slow.
If the provider name is not actually listed, we then need to follow the instruction of the Help Center to complete the procedure, by adding the DNS text record and copying the Google token displayed on screen: there we can find the instruction for lots of providers, that often have different systems, but it should not be that hard to complete the operation.
It is important then to remember not to remove the DNS record from the provider, even after successful verification, to keep the property always verified.
Verification through HTML file loading
The second method consist in the loading of a special HTML file in the site: in this case, we will first go on the verification for URL prefix and then on the HTML file section, from where we can download the resource we are going to later upload on our site’s root directory.
For instance, if we are trying to verify www.example.com its root directory would be the home page; while if the verification would be on www.example.com/party, the root directory is /party/. For the latter, by uploading the file in /party/ all child directories will be verified as well.
The file can be used on every site we want to verify, it is customized on our user and can be reused; moreover, confirmation of success is immediate so if it does not work we know right away we committed some kind of error! Again, removal of the verification file from the site will cause loss of site verification.
Verification with HTML Tag
The third system is relatively simple, but permission is needed to edit the source code of the site’s home page in order to proceed to verification with a <meta> tag to the HTML code. The process always begins with URL prefix selection, but in this case the GSC provides a tag with a custom key associated with a specific user. The string is to be copied and inserted into the <HEAD> tag on the home page, and we can verify directly from the source text that the insertion was successful; even with this method, verification is immediate if the process was successful. Verification with the HTML meta tag can be used for URL prefix properties, but not for Domain properties.
Verifying the site with Google Analytics monitoring code
This method is very quick for those who already use Google Analytics to monitor site traffic and have edit permission in the account: in order to proceed with the verification through a Google Analytics monitoring code we first of all need to use the same associated Google account or at least have the permission to edit related to the web property we are working on. Furthermore, we need to check that the home page actually has the Google Analytics tracking code in the head section of the page (not in the body one, even if still effective with Analytics).
The system follows the same path described for previous cases: we click on add property, choose URL prefix and enter the address, to then be linked to Analytics. Verification is immediate, except for errors, and in the video it is stressed that the verification is not made to get any kind of access to the Analytics data.
Verification with Google Tag Manager
As in the previous case, if we have a Google tag Manager account active on the site and we have permission to publish or an administrator role, we can verify site ownership using a code of the container snippet: before anything else, we need permission to publish on the Google Tag Manager container, alongside having to login Search Console with the same account and check that our home page has the <noscript> part of the Tag Manager code right after the opening <body> tag.
The proceeding continues in the same old way: we open the GSC, click on add property and enter the URL in the URL prefix. If we own all necessary permissions, the verification will be immediate after the click. Like for Analytics, here as well we are not linking the accounts of the two Google products, only making the verification easier.
Verifying ownership with Google Sites or Google Domains
If we intend to verify the ownership of a site created with the Google Sites platform or with a Google Domains domain, the process is very simple and instantaneous: in fact, as a rule, all the properties registered on that domain should be automatically verified through the entry in URL Prefix when we add them to Search Console, if we manage both products using the same Google Account.
In case we need to do manual verification, the process for Google Sites requires an additional step: if we have a site created before 2017 (and therefore we still use the classic version of Google Sites) or a site with a custom domain URL, we need to use the HTML tag method; on the other hand, if the site is newer (created from 2017 onwards with the new Google Site platform) and does not have a custom domain URL, we need to use the Google Analytics tracking code to trigger verification.
Verification through Blogger
If our site is hosted by Blogger (the platform – once known as Blogspot – that back in 2003 became part of the Google ecosystem), in order to perform the verification you will need to login the Search Console with the same account; right after adding the property in the URL prefix a screen will open confirming the successful end of the operation. Simple and automatic.
The advice: use multiple verification systems
Daniel Waisberg offers a last practical suggestion: to use multiple verification methods, so to be sure that at least one will succeed in the event of problems, errors or difficulties. Moreover, each property verified in Google Search Console requires at least one owner, but it should be better to have a few more of them, both for safety and easy access.
Lastly, for your own safety, is good to know that we can check the list of verified owners on any given moment and possibly proceed with the removal of these privileges if necessary (very useful if we are talking about an employee leaving the job or we changed company of SEO consultancy), so to prevent them the access to sensitive business data.
Which properties to verify, best practices according to Google
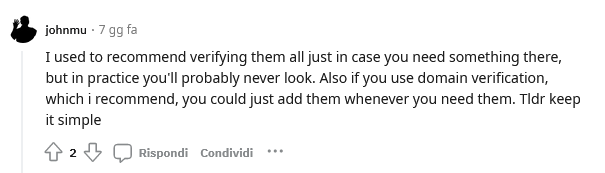
Then there is another issue that is of great interest to SEO, and especially to those actively involved in the comprehensive management of a site: which versions of the site to verify? Classically, Google’s basic answer is that you have to verify all variants of domain properties — e.g. www and non-www, HTTP and HTTPS — in order to effectively monitor and keep track of everything about the project. Yet, recently John Mueller admitted that “in practice the average user will probably never look at those other verified properties,” and that it is therefore sufficient to submit only the main domain property to the verification process (and basically enroll in Google Search Console).
Responding to a question from a user on Reddit, who was precisely asking for clarification about best practices with respect to GSC verification for alternate versions of site pages (which are all properly set up with automatic redirects of HTTP requests to HTTPS and non-www to www), Google’s Search Advocate premised that I usually “recommend verifying all of them in case you need something there” (in the other variants), but it’s actually much better to “keep it simple” and limit verification to the main domain verification. Also because, Mueller added, you can always then later add the other variants when you need them.
The most common site verification errors
If up to now we have focused on the standard processes, it is good to keep an eye and be informed also about the most frequent errors that we may encounter during the verification operation and that can therefore compromise the outcome.
It is the Search Console help page that helps us find out what are the most common errors in site verification, listing both general ones and those specific to the method used. In the former case, there are at least nine problems we can run into:
- Incorrect tags/snippets/files.
- Expired server connection.
- DNS error.
- Too many redirects for the download request.
- Invalid response from the server.
- Unable to connect to the server.
- Internal error.
- Timeout.
- Unable to find the domain.
Frequent problems with each method
The first error arises when you do not use the tag, code snippet, or file requested and received at the beginning of the verification; then sometimes you cannot verify the file due to a server timeout, which may be down or busy and therefore respond slowly. In these cases, you need to fix the problem and retry.
Google also reports as common an error when searching for the domain name of the site: the system tries to access the verification file, but cannot reach the domain due to a DNS error, either due to inactive server or a DNS routing problem for the domain.
Another problem arises when the download request has been redirected too many times and there is an infinite loop of the URL, or if the server returns an invalid response, for example, if access to the site requires password authentication or if there are other reasons that hinder the process.
Also frequent (but usually temporary) are connection errors to the site’s server, which can generate a total inability to reach the site or an attempt timeout (when the site or DNS no longer responds to Search Console requests). Finally, one can run into a generic internal error or enter a wrong URL, which prevents Google from finding the domain.
The specific errors by verification method
Added to this quick list, as mentioned, are the errors that may occur in the course of the specific verification method undertaken: again, these are nothing particularly complex, but easy procedures to correct and resolve.
Potential errors with DNS records
When we proceed with verification with DNS records there are two potential errors that can occur
- Verification record not found.
- Verification record not matching.
It may happen that Google takes a few minutes before seeing the published record, and thus an error is generated immediately; in the other case, we may have used a DNS provider verification record that is different from the value received by Search Console.
Potential errors with HTML files
There are four potential errors that those performing verification with HTML file uploads can fall into:
- Verification file not found.
- Verification file with incorrect content.
If we make changes to the file provided on the Verification page of Search Console, and thus if the name or contents of the file do not match the original, it will not be possible to complete the request successfully. Also, the file must be uploaded to the specified location.
- Compromised verification file.
Failure of the verification attempt seems to indicate that the site may have been compromised.
- Verification file redirects to a location that is not allowed.
Googlebot does not track verification file redirects; redirects within a single site are allowed, but not redirects to another site (meta tag verification is recommended).
Potential errors with HTML tags
There are only two problems that can happen to us with the HTML tag verification system, both arising from an underlying error:
- Meta tag not found or in wrong position.
- Incorrect meta tag.
As we know, the verification meta tag must be in the <HEAD> section of the page; any different position inevitably generates an error. In addition, Google suggests not touching the contents of the provided meta tag, but simply copy and paste from the Search Console Verification page to the correct location.
Potential errors with Google Analytics tracking code
The process using Google Analytics tracking code is likely to produce some increased complexity:
- Snippet not found.
- Invalid snippet.
- Wrong snippet found (outdated Google Analytics snippet or third-party Tag Manager/Tag Manager).
- Snippet in the wrong location.
- Lack of Google Analytics account or insufficient permissions.
On closer inspection, however, these problems arise from trivial reasons, such as placing the snippet in an incorrect location (i.e., <head> section of the home page), not using the provided snippet exactly, not having a valid Google Analytics Account or lacking editing permissions, and so on.
Potential errors with Google Tag Manager
Similar the argument for checking with Google Tag Manager:
- Insufficient permissions.
- Incorrect Tag.
- No Tag Manager container.
- Tag not found/wrong location.
In this case, the mandatory steps are to have administrator permissions for the Google Tag Manager account, create a container in the account, use the correct tag associated with it, and place it on the appropriate page and in the correct location.